
The Map
The Live tab is where most caching happens. It shows caches around you on a map (or as a list), lets you switch between map sources and view types, and gets you to a cache with the compass or turn-by-turn navigation.
Map and List
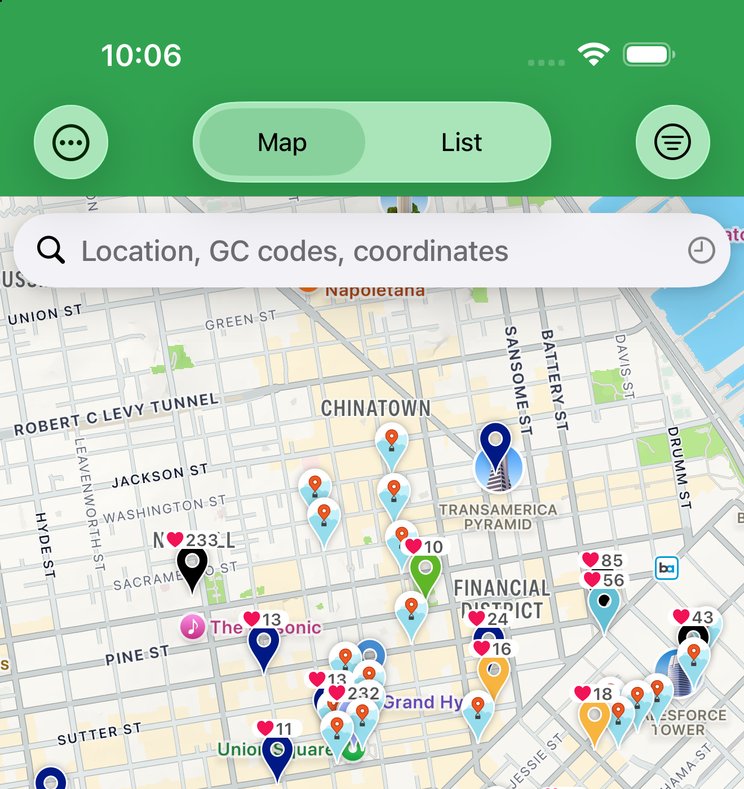
The Live tab toggles between a map and a list of the same caches. On the map, tapping a cache pin shows its callout, which carries all the same information a list row shows; tap the callout to open the cache’s details. In the list, tapping a row opens details directly. Pins are colored and iconed by cache type and status (found, owned, etc.), and you can layer highlights on top to mark caches visually.
List rows pack in the essentials — name, distance, difficulty, terrain, size, favorite count and GC code. The sort button (up/down arrows) opens a sheet with a Direction (ascending/descending) and a long list of sort types: Date Found, Date Last Found, Date Placed, Difficulty, Distance, FTF, Favorite Count, Favorite Percentage, Found, GC Code, Highlight Color and more. The same sort sheet is used in offline lists.
The Cache Callout
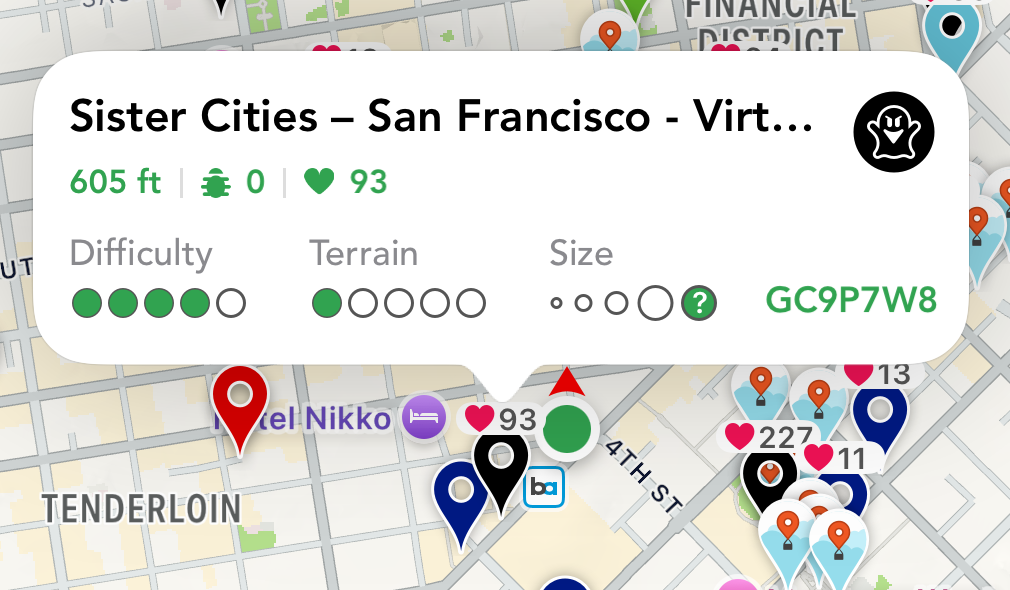
Tapping a pin pops up a callout that summarizes the cache without leaving the map: its name and type icon, distance from you, trackable and favorite counts, difficulty and terrain dots, container size and the GC code. Tap the callout itself to open the full detail screen.
Map Types
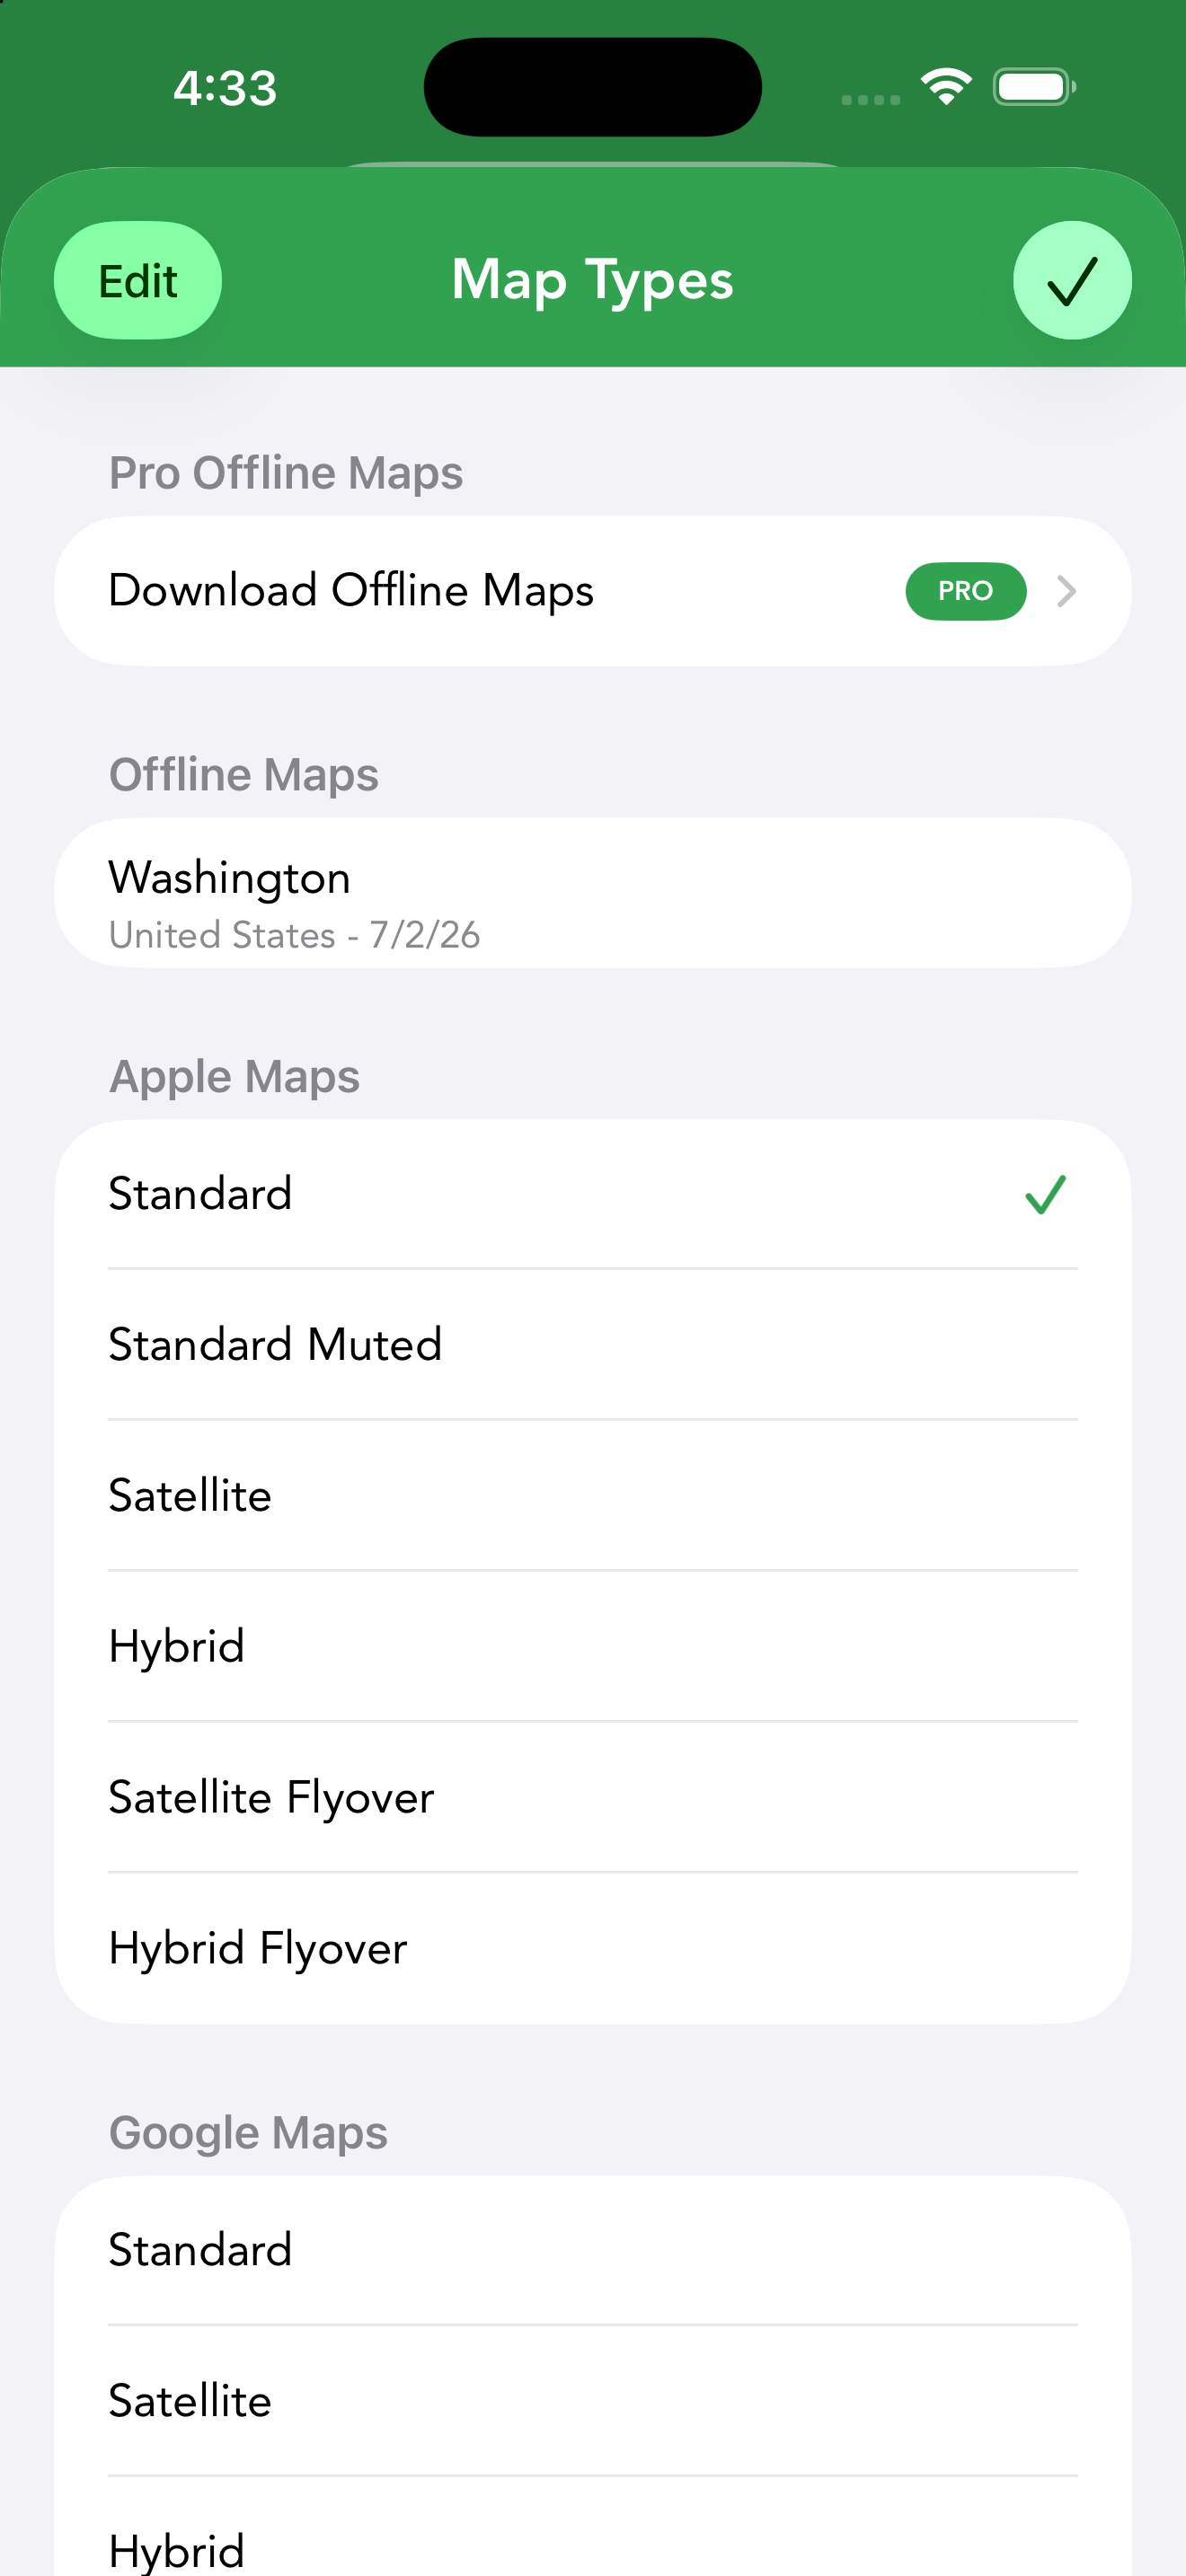
The map options icon in the map’s tool stack opens the Map Types panel; long-press it to jump between the types you used most recently — 3 by default, and you can raise it to a maximum of 6 with Number of Maps in Settings › Map Options & Navigation. The panel is organized into sections:
- Pro Offline Maps PRO — a Download Offline Maps entry for OpenStreetMap-based vector maps. See Offline Maps.
- Apple Maps — Standard, Standard Muted, Satellite, Hybrid, Satellite Flyover and Hybrid Flyover.
- Google Maps — Standard, Satellite, Hybrid and Terrain.
- Open Maps — Open Street and Open Cycle.
- Arc GIS — Satellite, Topo, Clarity and Nat Geo World Map.
- USGS — USGS Topo.
- Ordnance Survey (UK) — Street View (see below).
- Custom Tile URLs — point Cachly at your own tile server (see Custom Tile URLs).
From the same panel you can download Pro Offline Maps or add custom tile URLs. When an offline map is active, the map-options icon shows a diagonal line across it. Defaults and per-service API keys are set in Settings › Map Options & Navigation.
On-Map Controls
A tool stack sits along the right edge of the live map — top to bottom: Reload Geocaches, Proximity Alert, map options and Current Location — plus a compass / re-center control that appears when the map is rotated (tap it to snap back to north). A filter icon toggles the live-search filters; it fills solid black when a filter is active (outline when off), and “Filtering On” appears at the top of the map as a reminder.
Auto Load Map PRO — long-press the Reload icon (or enable it in Settings › Cachly Pro) and caches load automatically as you pan, no tapping Reload. It needs a sufficient zoom level (the button dims when you’re zoomed too far out).
The stack’s buttons and their states:
| Icon | What it does |
|---|---|
 |
Reload Geocaches — loads caches around the map center, within the search radius set in the live-search filters (100 mi by default). |
 |
Load more — the dot appears once an area has loaded; tap again to load more caches. |
 |
Auto Load PRO — Reload becomes a red play button while Auto Load is running; caches load automatically as you pan. |
 |
Clear loaded caches — removes the loaded caches. Appears at the top of the stack while Auto Load runs, and also when Clear Map On Refresh is turned off in Settings › Map Options & Navigation (caches then stay on the map until you clear them). |
 |
Proximity Alert — alerts you when you get close to a cache. |
 |
Proximity Alert (active) — the icon turns red while proximity alerts are on. |
 |
Map options — opens the Map Types panel; long-press to jump between your recent types. |
 |
Map options (offline map) — slashed while an offline map is the active map type. |
 |
Current Location — tap to recenter on your location; tap again to cycle the follow modes. |
 |
Follow — filled while the map follows your position as you move. |
 |
Follow heading — the map also rotates to match the direction you’re facing. |
 |
Navigation Target — on the navigation map only; fits you and the target on screen. |
 |
Back to target — jumps the map back to the navigation target. |
Bulk Actions from the Map
The … menu at the top-right of the live map acts on the caches currently loaded, not just one pin. It offers Add to List, Highlight and Export GPX, and each action asks for a scope:
- All Caches — everything loaded on the map.
- Visible Caches — only what’s inside the current viewport.
- Highlighted Caches — only caches with a highlight applied.
It’s the fastest way to sweep an area’s results into an offline list or a GPX file.
UK Ordnance Survey Maps
Online UK OS maps need a free Bing Maps API key (from bingmapsportal.com with Key Type Basic and Application Type Public Website, or reuse a GME key). Add it in the map-type chooser via Add Custom Tile URL → UK OS Maps preset, paste the key, Save.
Similarly, OpenCycleMaps needs a free Thunderforest API key — sign up at thunderforest.com, then paste the key under Settings › Map Options & Navigation › Map API Keys.
Your Location & Following
Your position shows as a pulsing icon with a red heading indicator; tap it for current coordinates, GPS accuracy and elevation, plus an action menu to Save Location, Create Offline Geocache or Copy Coordinates. The follow button (in the right-side tool stack) cycles through follow modes:
- No Follow — the map stays where you put it.
- Follow — the map tracks your location; panning disengages it.
- Follow With Heading — follows and rotates the map to match the direction you’re facing.
- Lock Follow — long-press to lock follow on and prevent accidental map moves.
View Types
Beyond the default live view, the map can show many different sets of caches. These are the map view types:
| View | Shows |
|---|---|
| Live | Caches near the current map region, fetched on the fly. |
| User’s Found / Hidden | Caches you’ve found, or that you own and hid. |
| Bookmarks | A bookmark list from your account. |
| Offline Lists | Caches saved in an offline list. |
| Favorites | Caches with favorite points. |
| Search Results | The output of an advanced search. |
| Navigation | A route to your selected cache. |
| Trackable Travels | The path a trackable has traveled. |
| Counties | County boundaries for county challenges PRO. |
| DeLorme Grid | DeLorme atlas grid pages for DeLorme challenges PRO. |
Adventure Labs on the Live Map
The live map loads Adventure Labs alongside regular geocaches. Parent Adventures appear the moment they load, then their individual stages fill in automatically; parent Adventure pins have an orange outline so they’re easy to tell apart from their stages. Every stage offers View Information — Cachly fetches the stage description on demand. When stages aren’t showing, tapping a parent Adventure’s pin loads that Adventure’s stages onto the map.
What loads is controlled in two places: the live search filters include Adventure Lab among the cache types plus an Exclude Adventures Stages switch, and with Auto Load PRO the Show Adventure Labs and Show Adventure Labs Stages switches under Settings › Cachly Pro apply.
How they look is set under Settings › Caches & Waypoints › Adventure Labs. Show Stage Indicator marks each stage pin with a stage icon — turn it off and stages are drawn as plain Adventure Lab pins. Show Parent Adventure controls whether the parent Adventure stays on the map and in the cache list when its stages are shown — turn it off to see only the stages themselves.
Navigating to a Cache
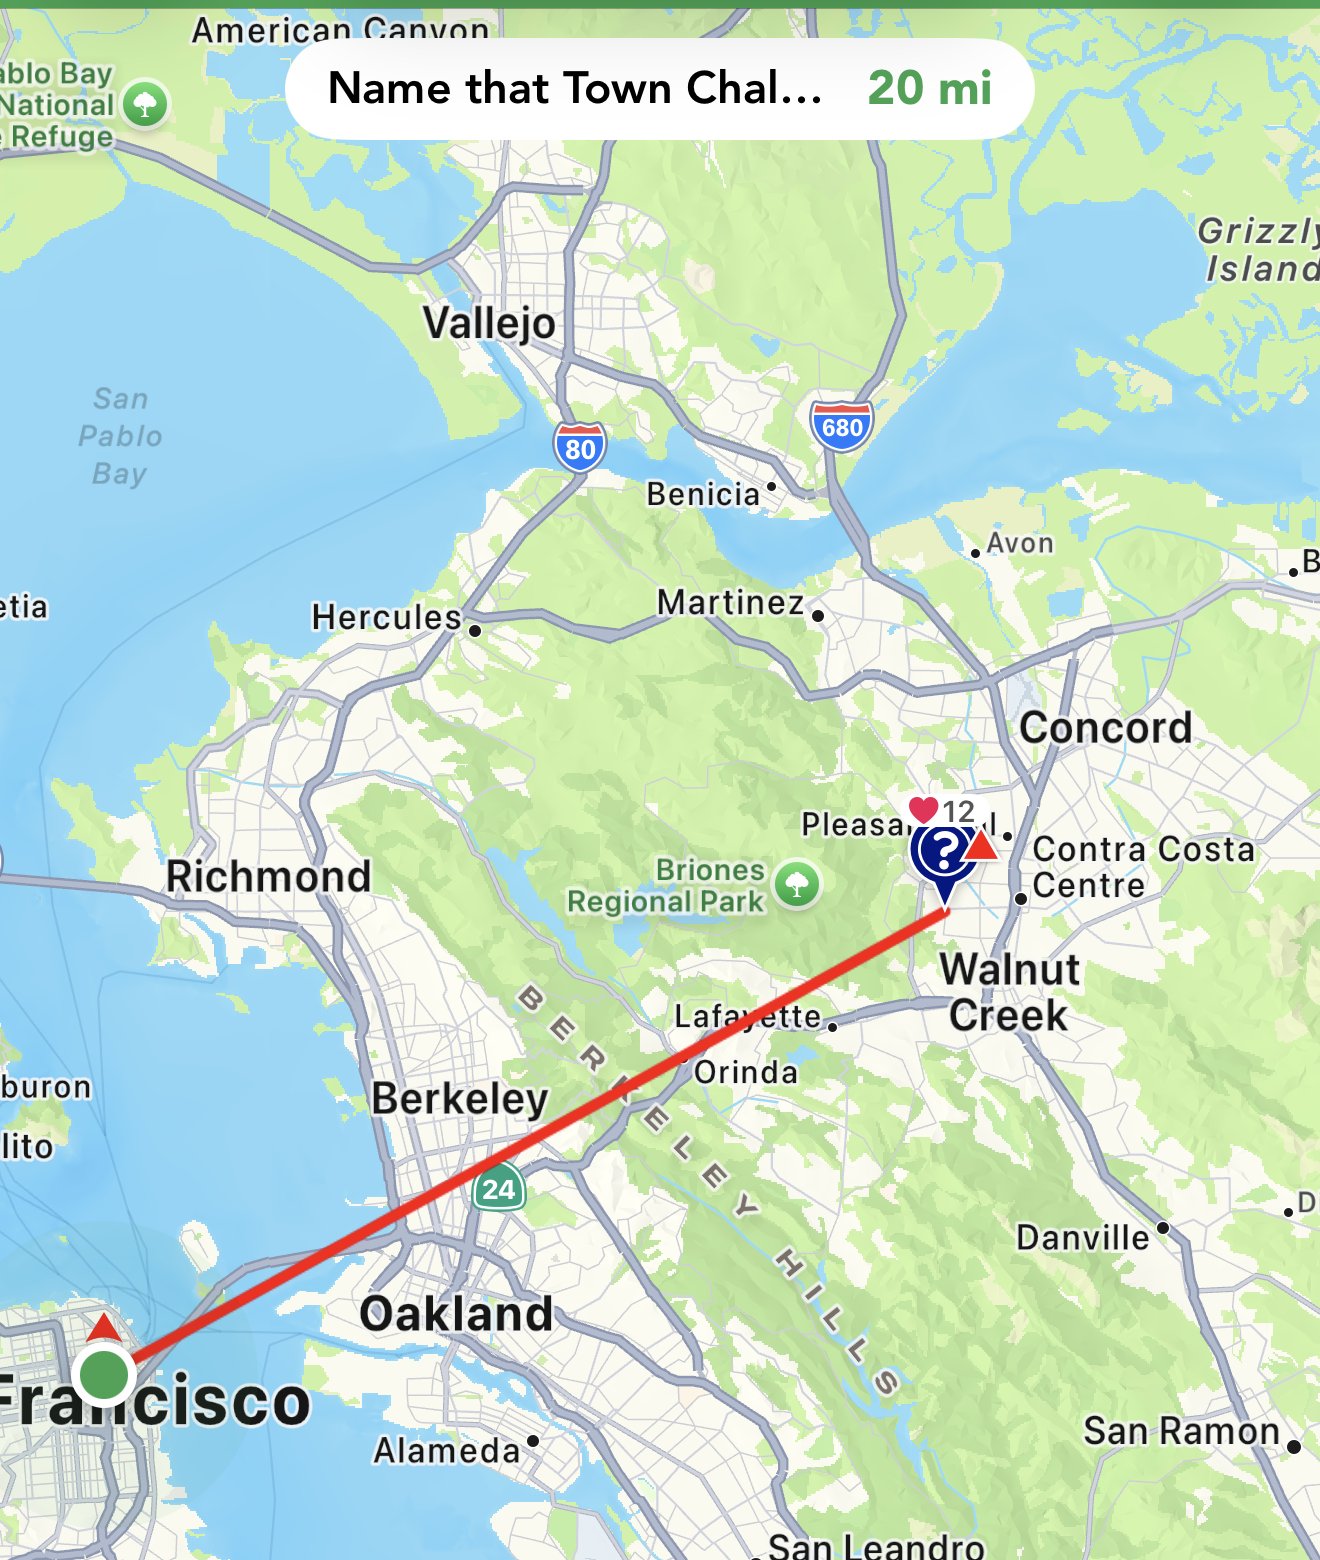
From a cache’s details, choose to navigate. The Navigate to Cache screen draws a direct line to the target and shows distance, bearing and accuracy alongside a compass arrow — ideal for the final approach where street maps run out. Related waypoints appear with a distinct symbol per type; a generic waypoint is a plain red pin, and multiples of one type are numbered (P01, P02 and so on). Other caches within 5 miles are shown. You can switch the target, zoom to fit both you and the cache, peek at Google Street View for terrain (this requires the Google Maps app installed), or set a proximity alert that fires even with the screen locked. To drive there, hand off to an external app — see routing apps below.
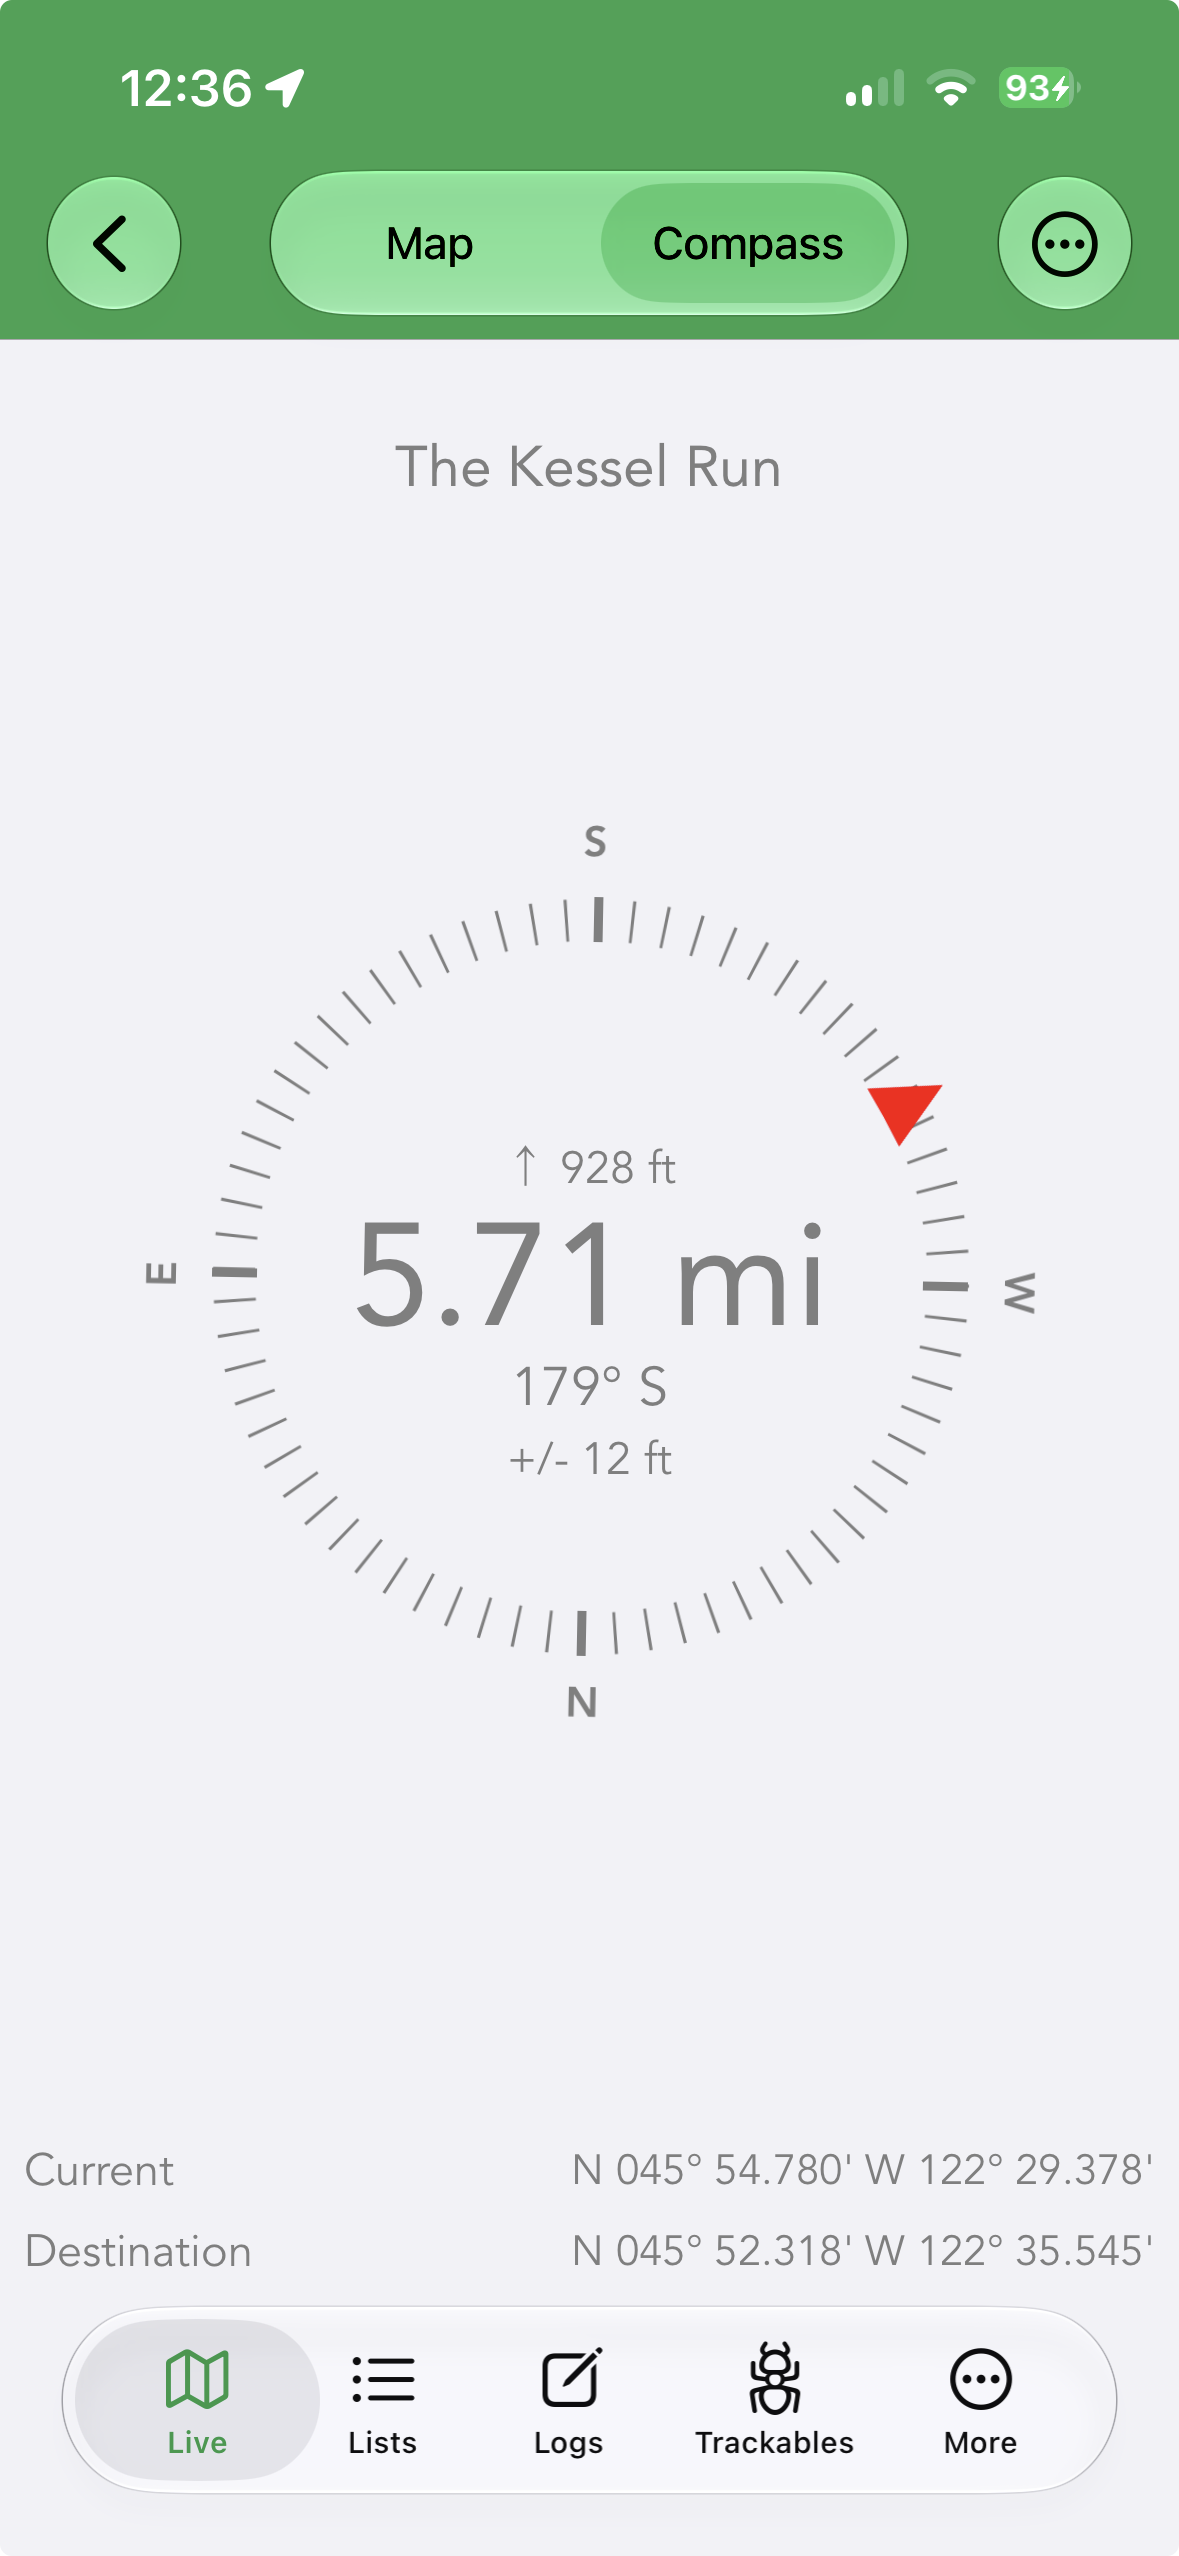
The Map / Compass toggle at the top of the Navigate screen switches to a full-screen compass: a red arrow on the compass ring points toward the cache while the centre shows the distance, elevation, bearing and GPS accuracy, with your current and destination coordinates listed at the bottom.
Routing Apps & the Navigation Menu
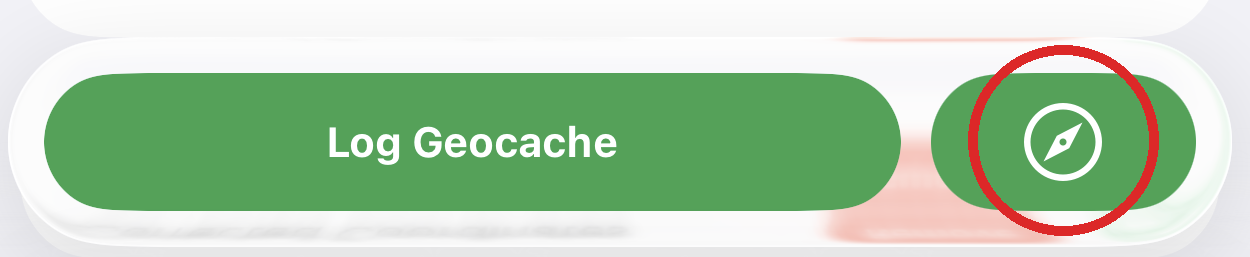
The navigation button in the toolbar of the Navigate screen opens a menu in three parts — actions for the cache you’re heading to, the list of routing apps, and sharing:
- Cache actions — when you’re navigating to a real cache, the menu starts with Log Geocache, View Hint and View Description, so you can read the hint or write your log without leaving navigation. Each row appears only when it applies: Log Geocache for GC-coded caches (not Adventure Labs), View Hint only when the cache has a hint, View Description only when it has one. Navigating to a dropped pin shows no cache actions.
- Routing Options — the external apps listed below.
- Share Location — opens the iOS share sheet with the target’s name and a
https://maps.google.com?q=link to its coordinates.
Cachly asks iOS whether each app is installed and hides the ones that aren’t, so the list is usually much shorter than the table below. Apple Maps and Google Maps are always offered — if the Google Maps app is missing, Cachly opens Google Maps directions in the browser instead. There is no default routing app to configure; you pick one each time. (CarPlay is the exception — it remembers the app you chose there; see the CarPlay page.)
URL schemes Cachly uses
Each hand-off is an iOS deep link. Cachly formats coordinates to six decimal places and percent-encodes the cache name (shown as Name (GC code) where a code exists). This is what gets sent:
| App | URL scheme | What Cachly sends |
|---|---|---|
| Pro Offline Maps on CarPlay PRO | — | No URL — Cachly navigates on its own offline maps. Listed only while CarPlay is connected. |
| Apple Maps | — | No URL — opened through iOS’s own Maps hand-off with the destination named and driving directions requested. Always available. |
| Google Maps | comgooglemaps:// | comgooglemaps://?saddr=lat,lon&daddr=name@lat,lon. Falls back to http://maps.google.com/maps?saddr=…&daddr=… in the browser when the app isn’t installed. |
| Navigon | navigon:// | navigon://cachly|name||||||lon|lat |
| OsmAnd Maps | osmandmaps:// | osmandmaps://?lat=&lon=&title= |
| Topo Maps | topomaps:// | topomaps://?lat,lon |
| HERE WeGo | here-route:// | Detected with here-route://, then opened as here-location://lat,lon. |
| TomTom | tomtomhome:// | tomtomhome://geo:action=show&lat=&long=&name= |
| TomTom Go | tomtomgo:// | tomtomgo://x-callback-url/navigate?destination=lat,lon |
| Mapy.cz | szn-mapy:// | Detected with szn-mapy://, then opened as the web link https://mapy.cz/zakladni?q=lat,lon. |
| Waze | waze:// | waze://?ll=lat,lon&navigate=yes — starts navigation straight away. |
| Guru Maps | galileo:// | galileo://lat,lon |
| GPS Navigation – Scout | hybridnavigation:// | hybridnavigation://cmd=mapOverview&latitude=&longitude=&addr1=name&addr2=GC code&addr3= |
| Maps.me | mapswithme:// | mapswithme://map?v=1&ll=&n=name&backurl=cachly://&appname=Cachly — the backurl gives Maps.me a link back to Cachly. |
| Organic Maps | om:// | om://route?sll=&saddr=&dll=&daddr=&type=vehicle — a full route from your position (My Location) to the cache, in driving mode. |
| Gaia GPS | gaiagps:// | gaiagps://map?lat=&lng=&z=16 — centres the map on the cache at zoom 16. |
| Pocket Earth | magikmap:// | magikmap://?lat=&lon=&name= |
| Sygic | com.sygic.aura:// | com.sygic.aura://coordinate|lon|lat|drive |
| Magic Earth | magicearth:// | magicearth://?drive_to&lat=&lon= |
Searching the Map
The search field accepts a place name, one or more GC codes (comma-separated), a coord.info URL, raw coordinates, or an OpenStreetMap POI query (q: — see OSM POI search); recent searches are kept for reuse. The refresh button (circular arrows, in the tool stack) loads caches for the current region; a dot in the middle of it means there are more caches to load — tap again to load them.
Dropping a Pin
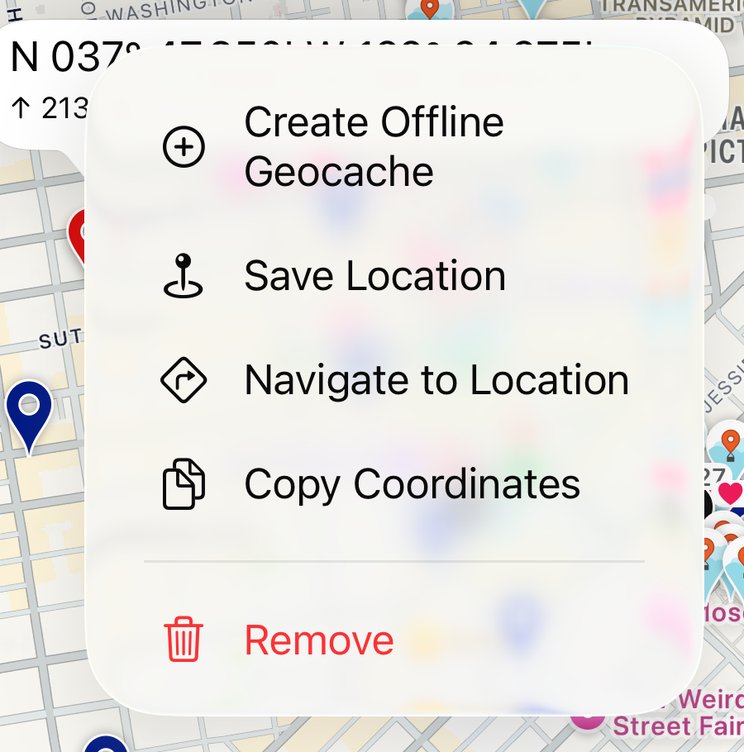
Long-press any empty spot on the map to drop a movable pin. Its callout shows the point’s coordinates and elevation, and the … button opens a menu of actions for that spot:
- Create Offline Geocache — make your own offline cache at the pin, stored in an offline list.
- Save Location — store the point in your Saved Locations.
- Navigate to Location — open navigation straight to the pin.
- Copy Coordinates — copy the point to the clipboard.
- Remove — clear the pin from the map.
The pin isn’t fixed once dropped — long-press the pin and drag it anywhere on the map to reposition it.
While the Navigate screen is showing, the same menu adds Set as Target so you can retarget the compass at the dropped point.
Saved Locations
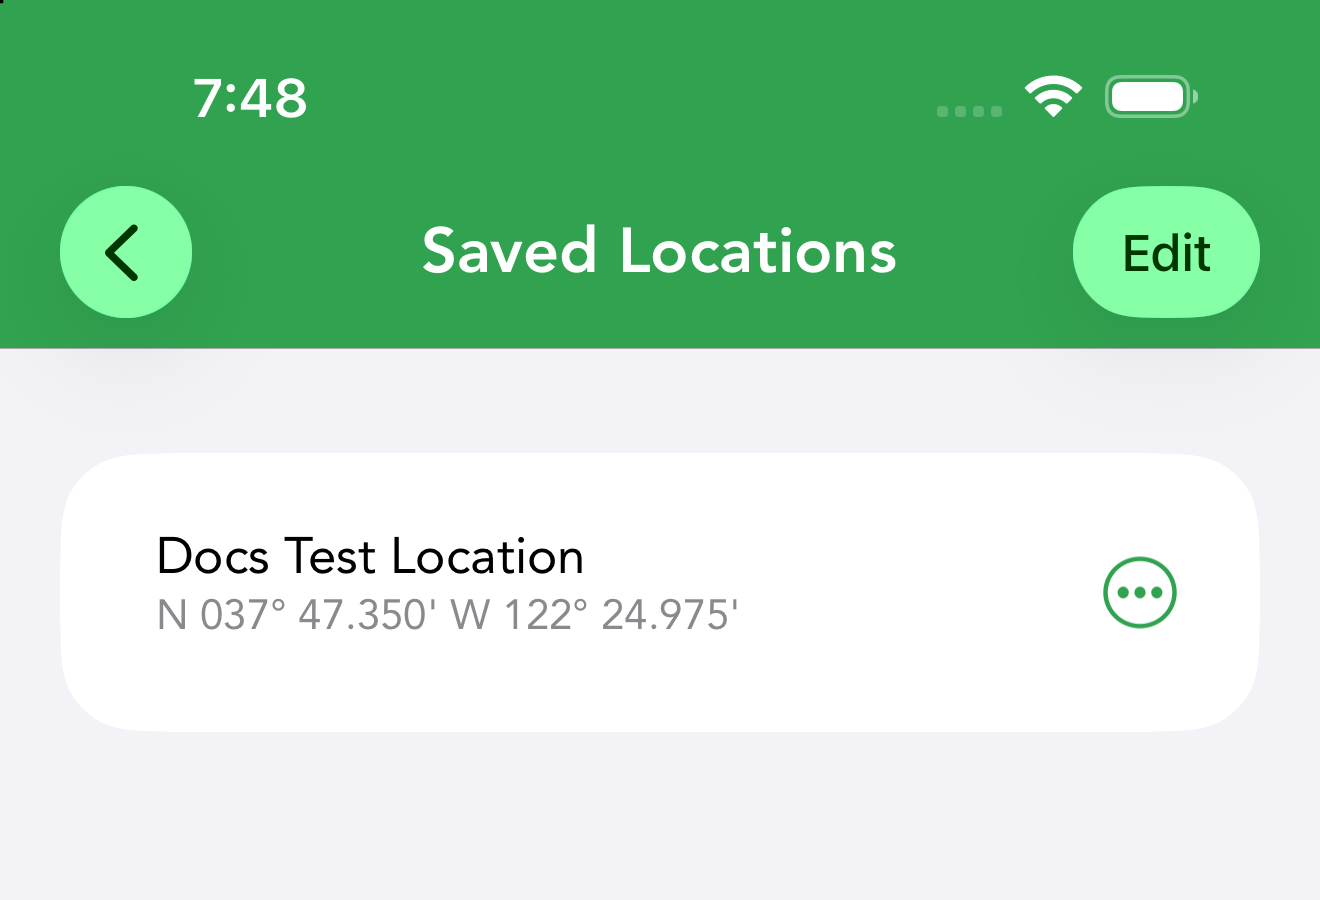
Choosing Save Location from a dropped pin opens the Save Location screen: give the spot a name and fine-tune its position with the coordinate picker (the same picker used for waypoints, with selectable coordinate formats). Saved spots collect under More › Saved Locations, where each row shows the name and coordinates with a count badge on the list. Each row’s … menu offers Share and Copy Coordinates — handy for trailheads, parking spots or anywhere you’ll want to find again.